There is a particular kind of attention that goes into choosing a summer manicure, different from any other season. The light is stronger, hands are more visible, and the whole palette of what feels appropriate shifts outward toward color and detail.
The range of what works in summer is genuinely wide. Tropical prints and fruit motifs land differently than they would in October, carried by the season rather than fighting against it. At the other end, clean minimalist styles hold their own precisely because the contrast between simplicity and summer’s visual noise is its own kind of statement.
Personal style is the better starting point than trend lists. Someone drawn to ocean-inspired designs, layered blues and greens with movement and depth, is going to wear that with more conviction than a trendy pattern that never quite clicked. The same goes for understated elegance. A single well-chosen neutral or a barely-there french can look more considered than a busy design done without confidence.
Technique matters too, regardless of where you land on the bold-to-minimal spectrum. Clean application, whether at a salon or at home, is what separates a finished manicure from a casual one. Getting that right is worth the extra few minutes at any level of complexity.
Tropical Palm Trees and Island Vibes

Picture yourself with a vacation on your nails. Tropical palm designs bring that island feeling straight to your summer manicure. You get silhouetted palms against colorful skies with turquoise, coral, and sunset orange working together perfectly.
Start with translucent base colors layered on your nails. Use a thin brush and dark polish to paint delicate palm fronds. Gelish or OPI gels keep everything looking fresh without chipping all summer long.
Think about adding glitter or chrome accents for extra shine. These details catch the light and give your nails real depth. Top everything with a quality seal coat so your design stays vibrant.
Longer nails show off these palm details best. If your nails are shorter, go for simplified silhouettes instead. Either way, the tropical vibe works and looks amazing.
Fruity Prints: Watermelon, Pineapple & Citrus
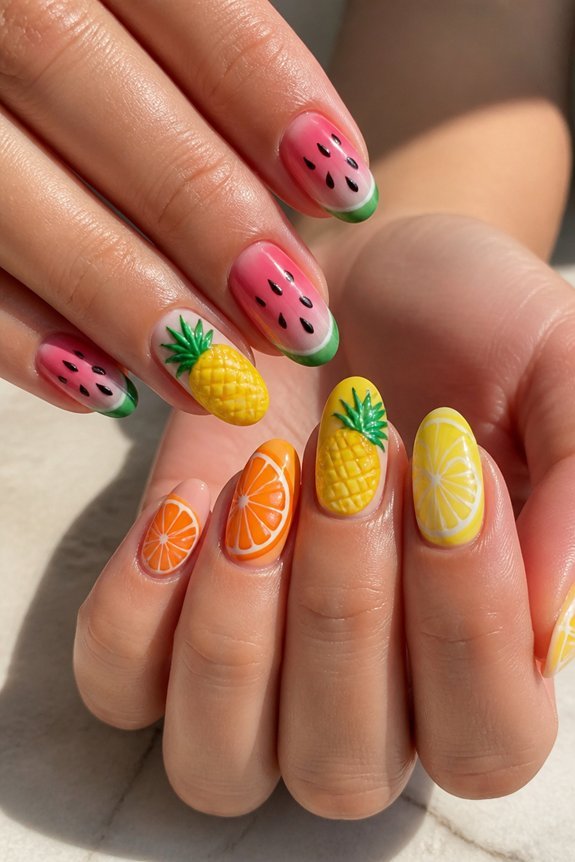
Pineapple designs feature textured yellow bases with geometric diamond patterns that mimic the fruit’s crown. Use thin detail brushes or stamping plates to nail the precision these designs deserve.
Lemons, limes, and oranges bring vibrant energy when you layer them with glossy topcoats. Add metallic accents to make your fruity manicure truly pop. Sally Hansen’s Hard as Nails Base Coat keeps all those detailed designs locked in place. The result? Summer-fresh nails that stop conversations and look amazing in photos.
Delicate Florals Your Garden Would Envy
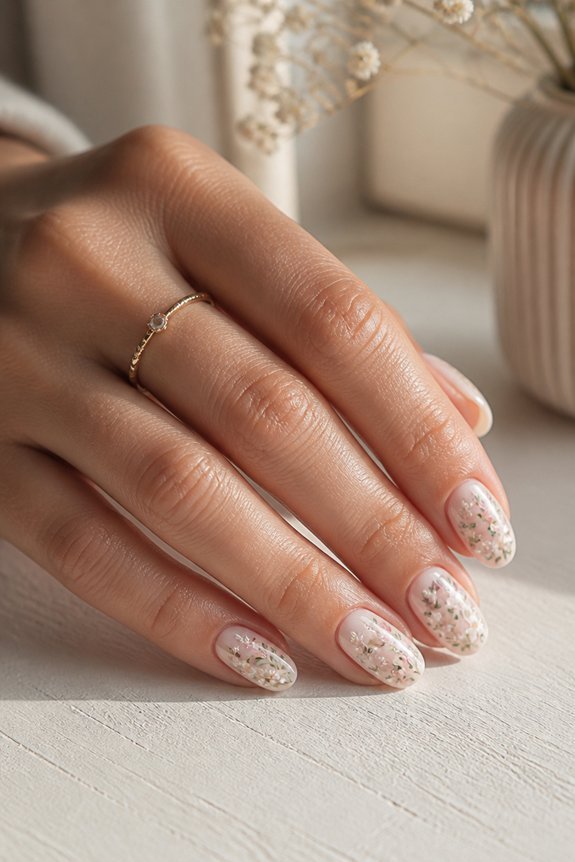
Floral nail art turns your nails into tiny gardens. You get soft pinks, lavenders, and whites that look fresh and elegant. Thin brushes and dotting tools help create those intricate details you see on Instagram.
Natural nails are perfect for florals. They celebrate your nail shape instead of hiding it. Daisy chains are beginner-friendly. Roses need a steadier hand and layering skills. Wildflowers let you mix different designs on each finger.
Gel polish keeps detailed florals looking beautiful for two weeks or longer. Orly and Essie offer solid base colors to start with. Try adding metallic accents or pearl finishes around your petals for extra dimension.
These botanical designs pair perfectly with summer dresses. They’re the kind of manicure people actually stop to admire.
Nautical Stripes and Anchor Details
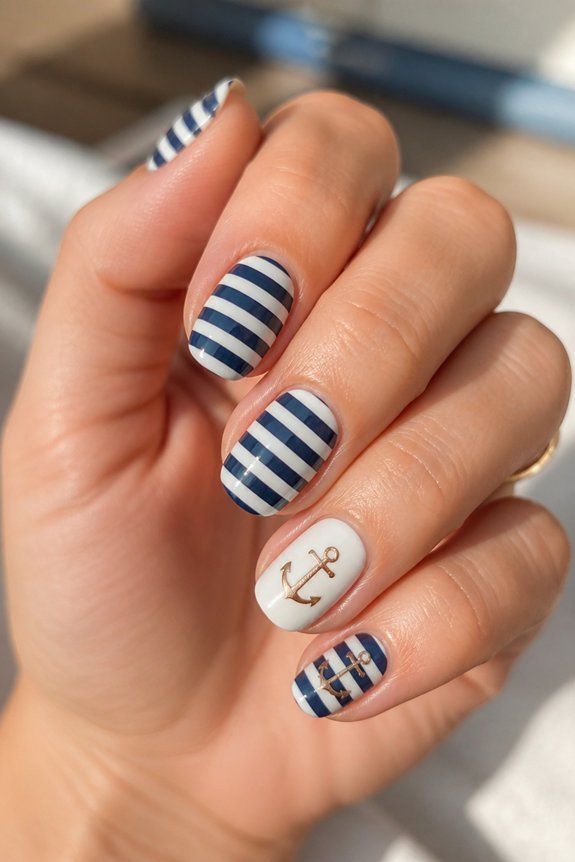
Start with navy and white horizontal stripes for that classic coastal look. Paint two thin base coats first, then grab striping tape to keep your lines sharp and even.
Gold or silver anchors on your accent nails bring real personality to the design. They add just enough detail without making things too busy. A glossy top coat brings out that polished, seaside feel beautifully.
Rope textures from stamping plates give authentic maritime touches. The key is balancing your patterns with plenty of empty space. Too many elements compete with each other, so pick what matters most to you.
This style works just as well for beach trips as it does for everyday wear.
Ocean Marble and Tie-Dye Effects
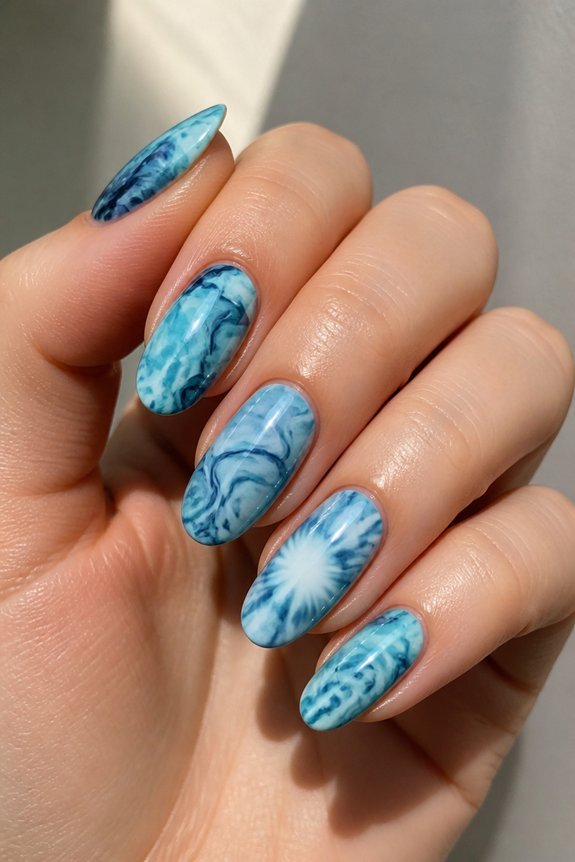
Water marble is easier than it looks. Drop your polish colors into a cup of room-temperature water, then dip your nail in at an angle. Each swirl turns out different, which is kind of the point. Tie-dye works directly on the nail instead. Layer your colors and swirl them together with a thin brush or toothpick for that groovy, blended effect.
Tropical shades like teal, coral, and soft yellow nail these techniques perfectly. Grab a quick-drying top coat to seal everything in place. Matte finishes make tie-dye pop, while glossy coats give marble that shiny, dimensional look. The best part? No two designs ever match, so your nails stay totally personal.
Neon Brights That Pop in the Sun
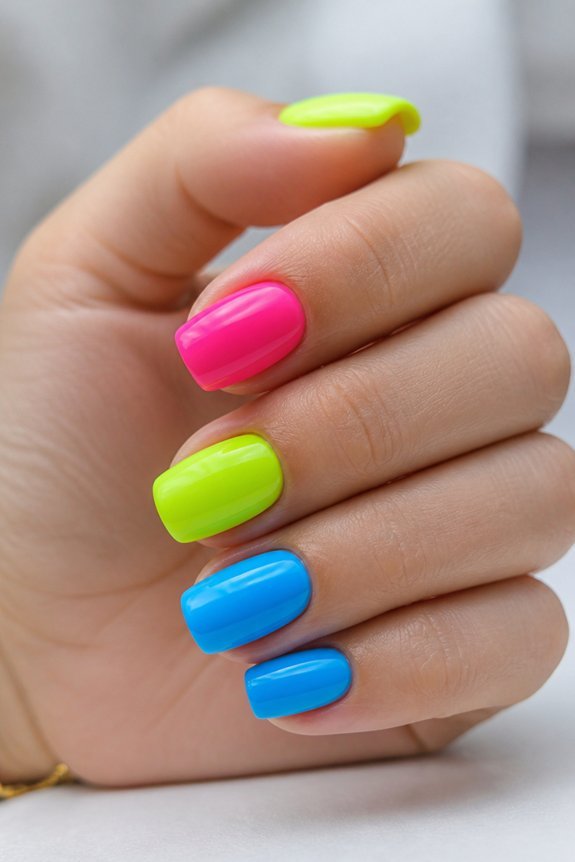
Love neon polish? The secret is letting the sun do the work. These bold colors shine brightest when natural light hits them just right, making your nails impossible to miss.
Start with a white base coat. It makes neon shades pop even more and gives you better color payoff. Two thin coats work better than one thick one, so take your time with application.
Essie Neon and OPI’s bright collections are solid choices if you’re shopping for quality pigmentation. They deliver that electric intensity without streaking or patchy coverage.
Want to dial up the sophistication? Pair your neon with metallic accents on one or two nails. Try chrome details or geometric patterns with neutral colors mixed in. This keeps your look bold but balanced, so it feels intentional instead of overwhelming.
Sunset Ombre: Gold to Pink Gradient

A gradient that mimics golden hour belongs on every summer nail rotation. This sunset ombre shifts seamlessly from warm gold at the cuticle to soft pink at the tip, creating depth and dimension.
Start with a base coat. Grab a makeup sponge and blend two complementary shades across the nail surface. OPI’s “Just Say Glaçé” and Essie’s “Fiji” work beautifully together for this effect.
The technique takes patience, but it’s worth the effort. Once you’ve blended your gradient, seal it with a glossy top coat to enhance the ombré’s luminosity. Consider applying a thin gold shimmer along the nail’s center line for extra dimension. This catches light beautifully and elevates the entire design.
The best part? Gradient nails photograph exceptionally well and suit all skin tones. You’ll get a result that feels both sophisticated and effortlessly summery.
Statement Solids: Bold Colors That Work
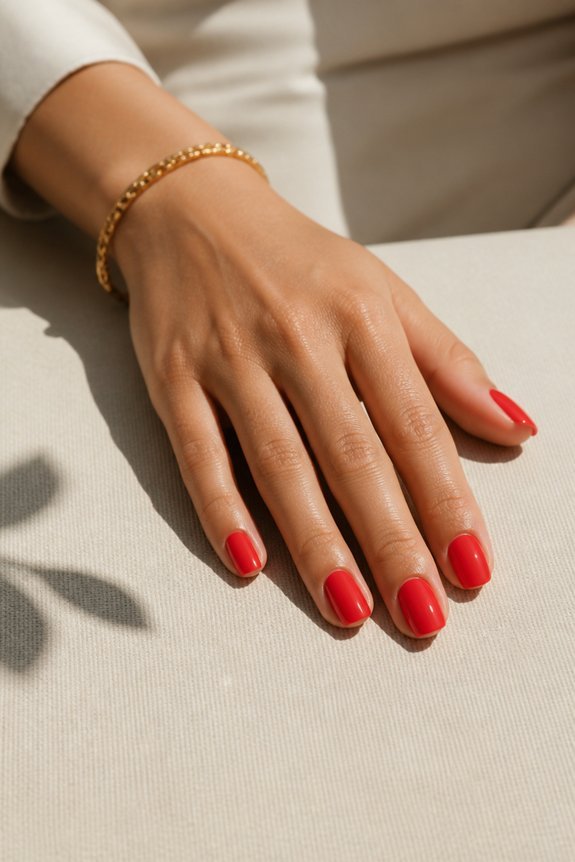
Pick one color and own it. That’s the magic of a statement solid manicure. Vibrant coral, deep emerald, and rich navy give you instant summer sophistication without any fuss.
Your formula matters more than you’d think. A quality polish like OPI’s Big Apple Red covers completely in just two coats. Essie’s Bahama Blue adds depth and dimension that cheaper polishes can’t match. These colors need healthy nail beds and careful application to really shine.
Start with a flawless base coat. That’s the secret professionals know. Your nails will look crisp and last longer when you nail this first step.
Play with finishes to change the vibe. Matte topcoats make glossy solids feel modern and sophisticated. High-shine versions bounce light around for maximum drama. Both work beautifully depending on your mood.
Keep everything else minimal. Skip the rings, bracelets, and busy nail art. Let your color do all the talking.
Pastel Ombre for a Dreamy Feel
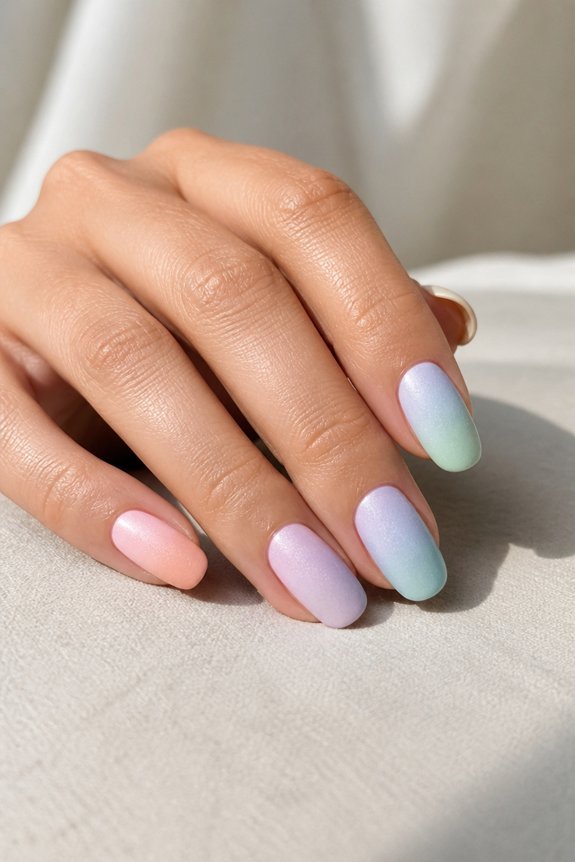
Soft colors don’t have to be boring. Pastel ombre gives you that gentle, sophisticated look while still turning heads. The technique layers two or three delicate shades across your nails, blending them for depth and dimension.
Start with your darkest shade at the base and fade to lighter tones toward the tip. A makeup sponge and light dabbing motions create that signature blended effect. Soft pinks, lavenders, and peach tones work beautifully for this style.
You’ll find great color options in Essie’s soft lacquers and Sally Hansen’s gel alternatives. This look works for summer weddings, everyday moments, or the office. It’s playful enough to feel special but polished enough for any occasion.
Minimalist Negative Space in White
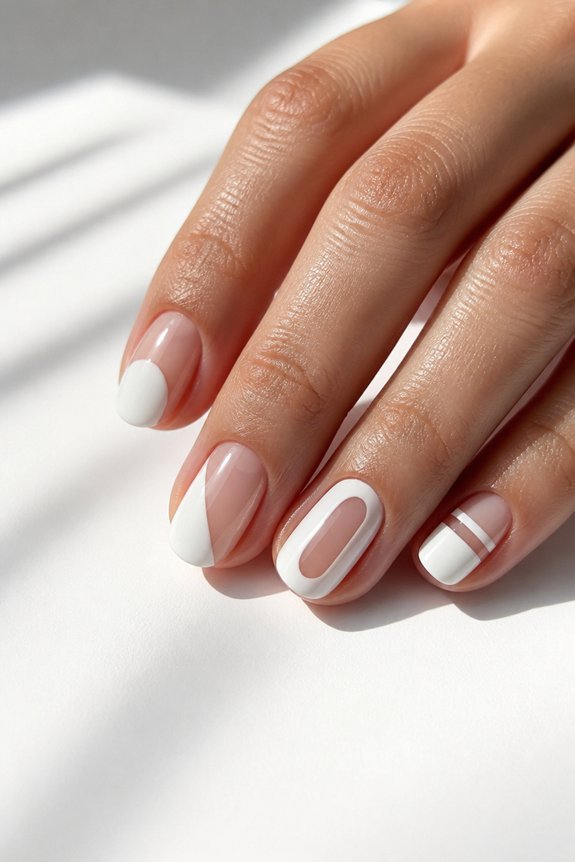
Negative space is your secret weapon for nail art impact. Skip the polish on certain areas and let your natural nail show through. When you pair bare patches with crisp white polish, you get a look that’s both modern and effortless.
Geometric designs work best for this style. Think thin white lines creating half-moons or sharp angles along your nail edges. You’ll need a white polish with solid coverage in one coat, like Sally Hansen’s Hard as Nails White. A thin brush is your best friend for getting those clean, sharp lines.
This technique looks great on any nail length, but shorter nails really show off the design. The whole point is balancing sophistication with simplicity. You get a polished look that works everywhere from the office to casual hangouts.
Glitter Gradient for Maximum Shine

Love sparkle? Glitter gradients are your answer. You layer shimmer from light to dark across your nail, creating an ombré that bounces light everywhere.
Start with a pale base coat. Then add progressively darker glitter densities as you move toward the tip. Essie’s Gel Couture and Sally Hansen both sell pre-mixed gradient sets that make this super simple. The payoff is stunning dimension through smart light reflection. Seal it all with a glossy top coat to maximize that shine.
Longer nails show off the color progression best, so gradients really shine on them. If your nails are shorter, just focus the glitter on the tips instead. Either way, you get serious visual impact without sacrificing comfort during summer.
Playful Polka Dots and Checkerboard Patterns
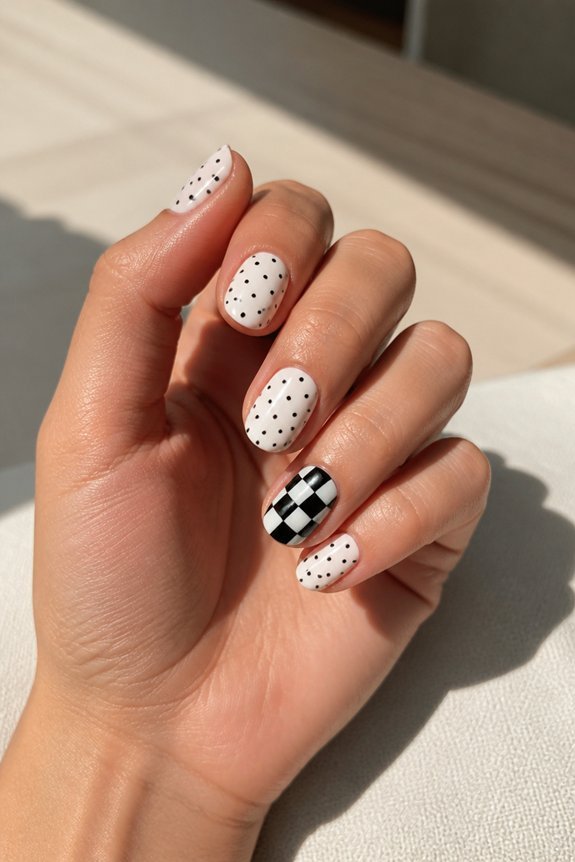
Polka dots are your easiest summer nail win. Small dots look timeless and cheerful. Go bigger if you want more impact and less precision needed.
Checkerboard designs need two colors that work together. A thin brush or dotting tool keeps everything sharp. White and pastels feel summery. Black and neon give you an edgy vibe.
Sally Hansen’s Complete Salon Manicure glides on smoothly for dot work. OPI’s base coat keeps patterns looking fresh through hot, sticky weather. Try matte for dots and glossy topcoats for checkerboards to add depth.
Mix patterned nails with solid colors so your hands don’t feel too busy. French tips with tiny dots look elegant. These designs work for beach afternoons and dinner nights alike.
Frequently Asked Questions
How Long Do Summer Nail Designs Typically Last Before Chipping?
Summer nail designs typically last between one to three weeks before noticeable chipping occurs. The longevity depends on the application method used—gel manicures generally last longer than traditional polish, which chips more quickly due to daily activities and sun exposure.
What Base Coat Should I Use to Make Nail Polish Designs More Durable?
A quality base coat like gel or ridge-filling formula creates a stronger foundation for nail polish designs. These products adhere better to nails, preventing chipping and extending wear time considerably. Application of two base coat layers offers ideal durability for summer nail art.
Can I Create These Designs at Home or Do I Need Professional Help?
One can create cute summer nail designs at home with practice and basic tools. Simple patterns work well for beginners, while intricate designs may benefit from professional application. Patience and quality supplies improve at-home results considerably.
What’s the Best Way to Remove Gel or Acrylic Summer Nail Designs Safely?
One can safely remove gel or acrylic nails by soaking them in acetone for 10-15 minutes, then gently peeling away the softened material. Alternatively, filing down the extensions and using cuticle oil prevents damage to natural nails underneath.
Which Nail Shapes Work Best for Displaying Intricate Summer Nail Art Patterns?
Almond and coffin shapes showcase intricate patterns beautifully, while oval and square shapes provide balanced canvases. Stiletto nails offer dramatic platforms, yet they demand skilled application. These elongated forms maximize surface area, allowing designs to flourish.
Conclusion
Summer nail designs are a canvas waiting for personal expression. Whether choosing bold tropical motifs or understated minimalist styles, each design tells a story of individual taste. These nine trending aesthetics offer something for everyone before autumn arrives. The key to nailing summer style? Select designs that reflect genuine personality while embracing seasonal color palettes. Beauty ultimately blooms when confidence meets creativity on fingertips.